Madsci

Husband, Father, Musician, Engineer, Teacher, Thinker, Pilot, Mad, Scientist, Writer, Philosopher, Poet, Entrepreneur, Busy, Leader, Looking for ways to do something good in a sustainable way,... to be his best,... and to help others to do the same. The universe is a question pondering itself... we are all a part of the answer.

Nov 212010
 

Often church sound folk are looking for the cheapest possible solution for recording their services. In this case, they want to use a low-end voice recorder and record directly from the mixing board.

There are a number of challenges with this. For one, the voice recorder has no Line input – it only has a Mic-input. Another challenge is the AGC on the recorder which has a tendency to crank the gain way up when nobody is speaking and then crank it way down when they do speak.

On the first day they presented this “challenge” they simply walked up (at the last minute) and said: “Hey, plug this into the board. The guys at Radio Shack said this is the right cable for it…”

The “right cable” in this case was an typical VCR A/V cable with RCA connectors on both ends. On one end there was a dongle to go from the RCA to the 1/8th inch stereo plug. The video part of the cable was not used. The idea was to connect the audio RCA connectors to the tape-out on the mixer and plug the 1/8th inch end of things into the Mic input on the voice recorder.

This by itself was not going to work because the line level output from the mixer would completely overwhelm the voice recorder’s mic input– but being unwilling to just give up, I found a pair of RCA-1/4 inch adapters and plugged the RCA end of the cable into a pair of SUB channels on the mixer (in this case 3 & 4). Then I used the sub channel faders to drop the line signal down to something that wouldn’t overwhelm the voice recorder. After a minute or two of experimenting (all the time I had really) we settled on a setting of about -50db. That’s just about all the way off.

This worked, sort of, but there were a couple of problems with it.

For one, the signal to noise ratio was just plain awful! When the AGC (Automatic Gain Control) in the voice recorder cranks up during quiet passages it records all of the noise from the board plus anything else it can get it’s hands on from the room (even past the gates and expanders!).

The second problem was that the fader control down at -50 was very touchy. Just a tiny nudge was enough to send the signal over the top and completely overload the little voice recorder again. A nudge the other way and all you could get was noise from the board!

(Side note: I want to point out that this is a relatively new Mackie board and that it does not have a noise problem! In fact the noise floor on the board is very good. However the voice recorder thinks it’s trying to pick up whispers from a quiet room and so it maxes out it’s gain in the process. During silent passages there is no signal to record, so all we can give to the little voice recorder is noise floor — it takes that and adds about 30db to it (I’m guessing) and that’s what goes onto it’s recording.)

While this was reportedly a _HUGE_ improvement over what they had been doing, I wasn’t happy with it at all. So, true to form, I set about fixing it.

The problem boils down to matching the pro line level output from the mixer to the consumer mic input of the voice recorder.

The line out of the mixer is expecting to see a high input impedance while providing a fairly high voltage signal. The output stage of the mixer itself has a fairly low impedance. This is common with today’s equipment — matching a low impedance (relatively high power) output to one (or more) high impedance (low power, or “bridging”) input(s). This methodology provides the ability to “plug anything into anything” without really worrying too much about it. The Hi-z inputs are almost completely un-noticed by the Low-z outputs so everything stays pretty well isolated and the noise floor stays nice and low… but I digress…

On the other end we have the consumer grade mic input. Most likely it’s biased a bit to provide some power for a condenser mic, and it’s probably expecting something like a 500-2500 ohm impedance. It’s also expecting a very low level signal – that’s why connecting the line level Tape-Out from the mixer directly into the Mic-Input completely overwhelmed the little voice recorder.

So, we need a high impedance on one one end to take a high level line signal and a low impedance on the other end to provide a low level (looks like a mic) signal.

We need an L-Pad !
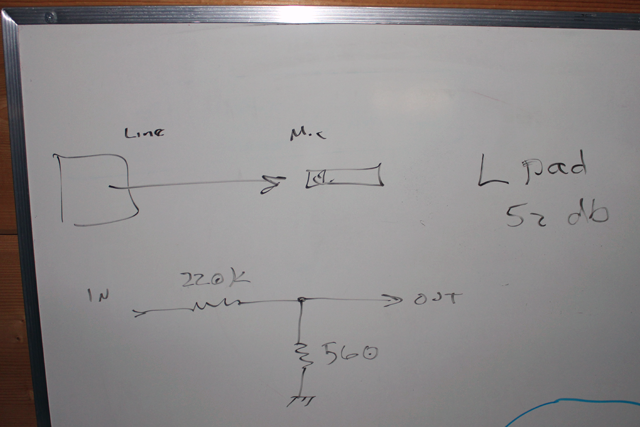
As it turns out, this is a simple thing to make. Essentially an L-Pad is a simple voltage divider network made of a couple of resistors. The input goes to the top of the network where it sees both resistors in series and a very high impedance. The output is taken from the second resistor which is relatively small and so it represents a low impedance. Along the way, the voltage drops significantly so that the output is much lower than the input.

Another nifty thing we get from this setup is that any low-level noise that’s generated at the mixer is also attenuated in the L-Pad… so much so that whatever is left of it is essentially “shorted out” by the low impedance end of the L-Pad. That will leave the little voice recorder with a clean signal to process. Any noise that shows up when it cranks up it’s AGC will be noise it makes itself.

(Side note: Consider that the noise floor on the mixer output is probably at least 60 db down from a nominal signal (at 0 db). Subtract another 52 db from that and the noise floor from that source should be -112 db! If the voice recorder manages to scrape noise out of that then most of it will come from it’s own preamp etc…)

We made a quick trip to Radio Shack to see what we could get.
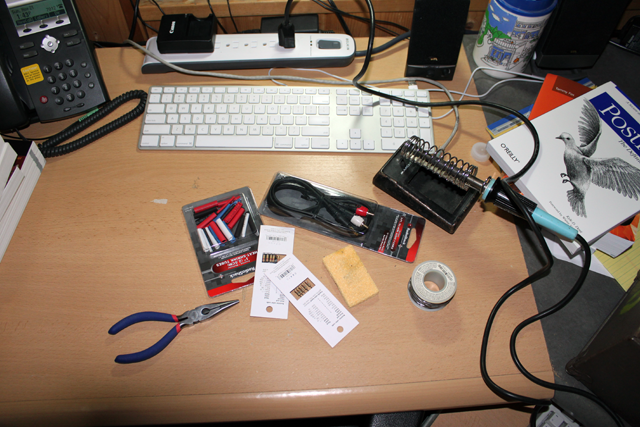
To start with we picked up an RCA to 1/8th inch cable. The idea was to cut the cable in the middle and add the L-Pad in line. This allows us to be clear about the direction of signal flow– the mixer goes on the RCA end and the voice recorder goes on the 1/8th inch end. An L-Pad is directional! We must have the input on the one side and the output on the other side. Reverse it and things get worse, not better.

After that we picked up a few resisters. A good way to make a 50db L-Pad is with a 33K Ω resistor for the input and a 100 Ω resistor for the output. These parts are readily available, but I opted to go a slightly different route and use a 220K Ω resistor for the input and a 560 Ω resistor for the output.

There are a couple of reasons for this:

Firstly, a 33K Ω impedance is ok, but not great as far as a “bridging” input goes so to optimize isolation I wanted something higher.

Secondly, the voice recorder is battery powered and tiny. If it’s trying to bias a 100 Ω load to provide power it’s going to use up it’s battery much faster than it will if the input impedance is 560 Ω. Also 560 Ω is very likely right on the low end of the impedance of the voice recorder’s input so it should be a good match. It’s also still low enough to “short out” most of the noise that might show up on that end of things for all intents and purposes.

Ultimately I had to pick from the parts they had in the bin so my choices were limited.

Finally I picked up some heat-shrink tubing so that I could build all of this in-line and avoid any chunky boxes or other craziness.

Here’s how we put it all together:
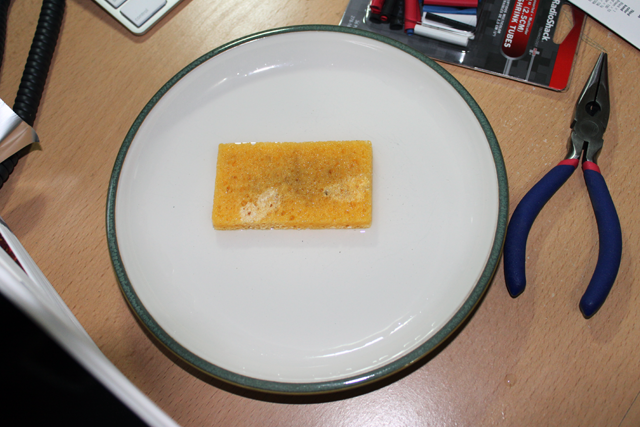
1. Heat up the old soldering iron and wet the sponge. I mean old too! I’ve had this soldering iron (and sponge) for close to 30 years now! Amazing how long these things last if you take care of them. The trick seems to be – keep your tip clean. A tiny sponge & a saucer of water are all it takes.
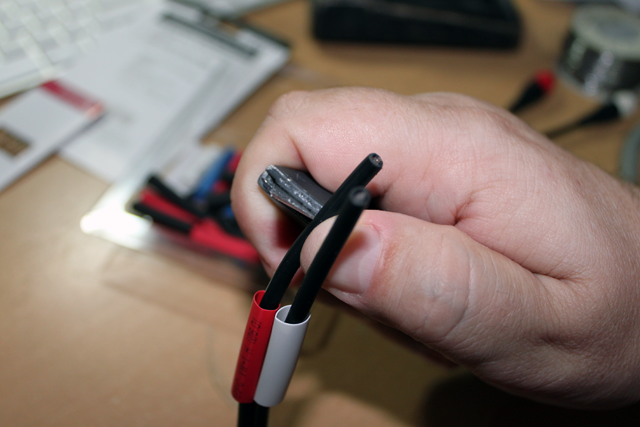
2. Cut the cable near the RCA end after pulling it apart a bit to provide room to work. Set the RCA ends aside for now and work with the 1/8th in ends. Add some short lengths of appropriately colored heat-shrink tubing and strip a few cm of outer insulation off of each cable. These cables are CHEAP, so very carefully use a razor knife to nick the insulation. Then bend it open and work your way through it so that you don’t nick the shield braid inside. This takes a bit of finesse so don’t be upset if you have to start over once or twice to get the hang of it. (Be sure to start with enough cable length!)
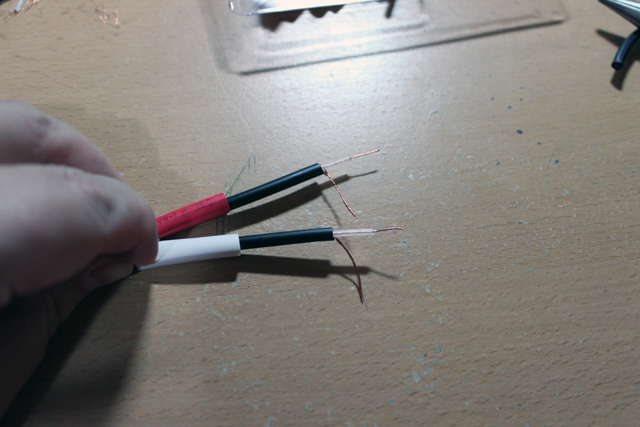
3. Twist the shield braid into a stranded wire and strip about 1 cm of insulation away from the inner conductor.
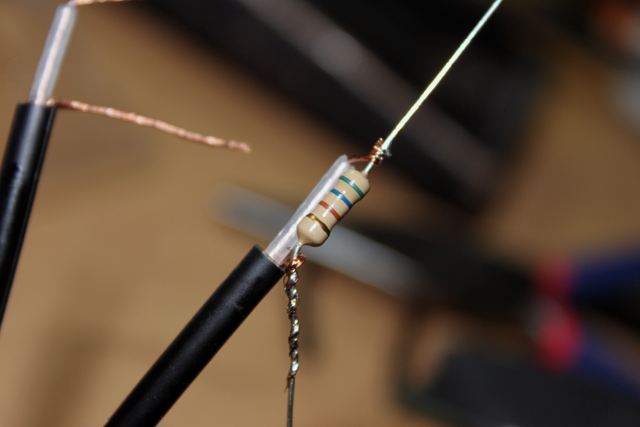
4. Place a 560 Ω resistor along side of the inner conductor. Twist the inner conductor around one lead of the resistor, then twist the shield braid around the other end of the resistor. Then solder these connections in place. Use caution — the insulation in these cables is very sensitive to heat. Apply the tip of your soldering iron to the joint as far away from the cable as possible and then sweat the solder toward the cable from there. This allows you to get a good joint without melting the insulation. Do this for both leads.
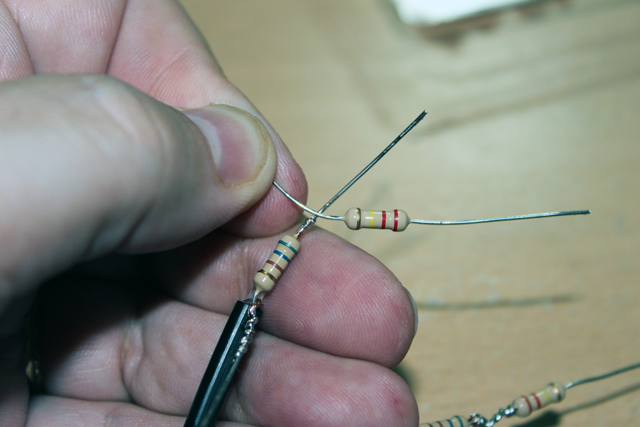
5. The 560 Ω resistors are now across the output side of our L-Pad cable. Now we will add the 220K Ω series resistors. In order to do this in-line and make a strong joint we’re going to use an old “western-union” technique. This is the way they used to join telegraph cables back in the day – but we’re going to adapt it to the small scale for this project. To start, cross the two resistor’s leads so that they touch about 4mm from the body of each resistor.
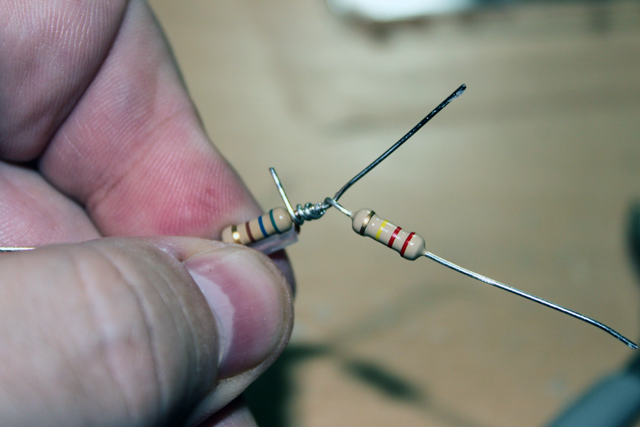
6. Holding the crossing point, 220K Ω resistor, and 560 Ω lead in your right hand, wind the 220K Ω lead tightly around the 560 Ω lead toward the body of the resistor and over top of the soldered connection.
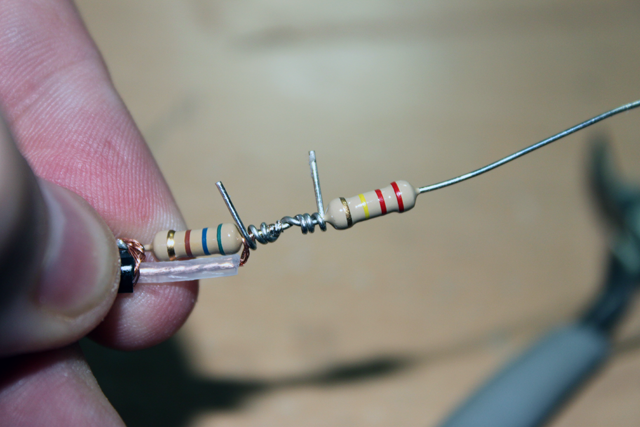
7. Holding the 560 Ω resistor and cable, wind the 560 Ω resistor’s lead tightly around the 220K Ω resistor’s lead toward the body of the resistor.
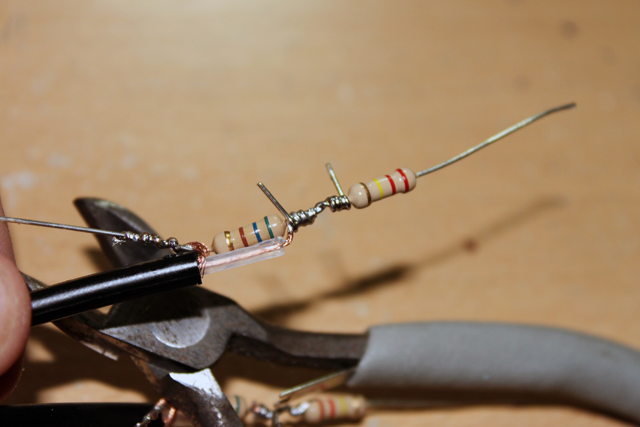
8. Solder the joint being careful to avoid melting the insulation of the cable. Apply the tip of your soldering iron to the part of the joint that is farthest from the inner conductor and sweat the solder through the joint.
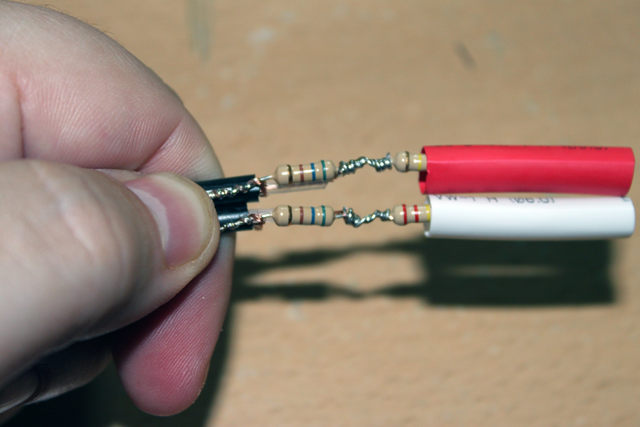
9. Clip of the excess resistor leads, then slide the heat-shrink tubing over the assembly toward the end.
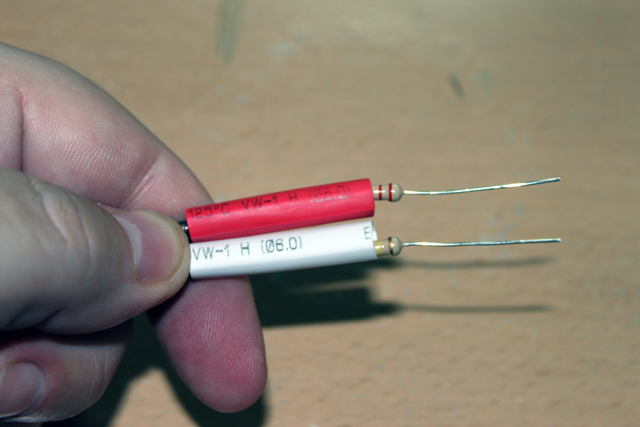
10. Slide the inner tubing back over the assembly until the entire assembly is covered. The tubing should just cover 1-2 mm of the outer jacket of the cable and should just about cover the resistors. The resistor lead that is connected to the shield braid is a ground lead. Bend it at a right angle from the cable so that it makes a physical stop for the heat-shrink tubing to rest against. This will hold it in place while you shrink the tubing.
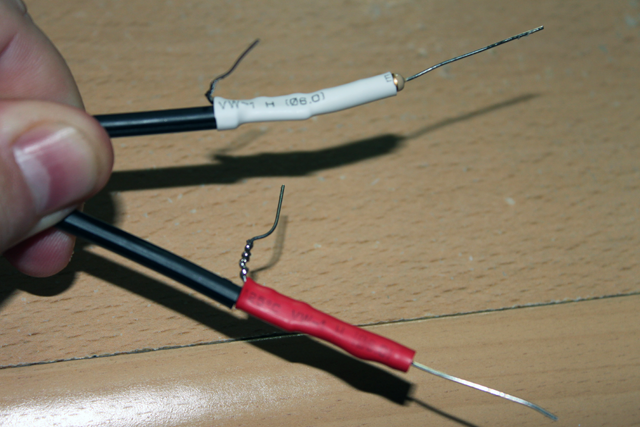
11. Grab your hair drier (or heat gun if you have one) and shrink the tubing. You should end up with a nice tight fit.
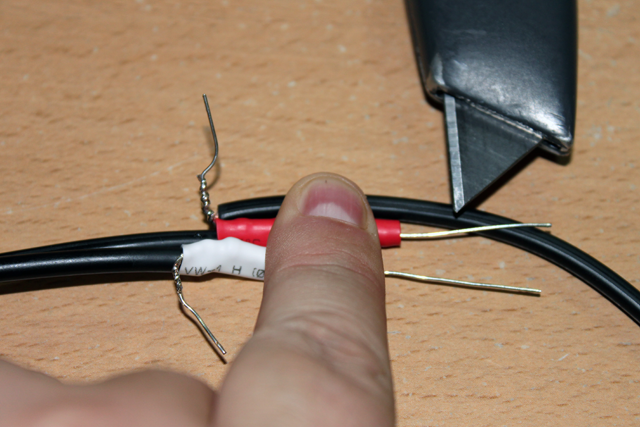
12. Grab the RCA end of the cable and lay it against the finished assembly. Red for red, and white for white. You will be stripping away the outer jacket approximately 1 cm out from the end of the heat-shrink tubing. This will give you a good amount of clean wire to work with without making the assembly too long.
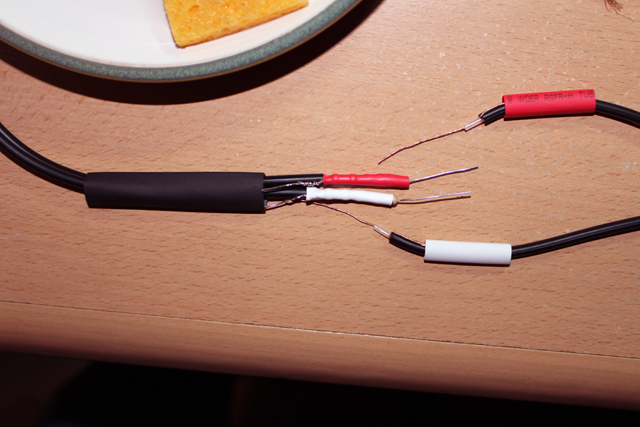
13. After stripping away the outer jacket from the RCA side and prepping the shield braid as we did before, strip away all but about 5mm of the insulation from the inner conductor. Then slide a length of appropriately colored heat shrink tubing over each. Get a larger diameter piece of heat-shrink tubing and slide it over the 1/8 in plug end of the cable. Be sure to pick a piece with a large enough diameter to eventually fit over both resistor assemblies and seal the entire cable. (Leave a little more room than you think you need.)
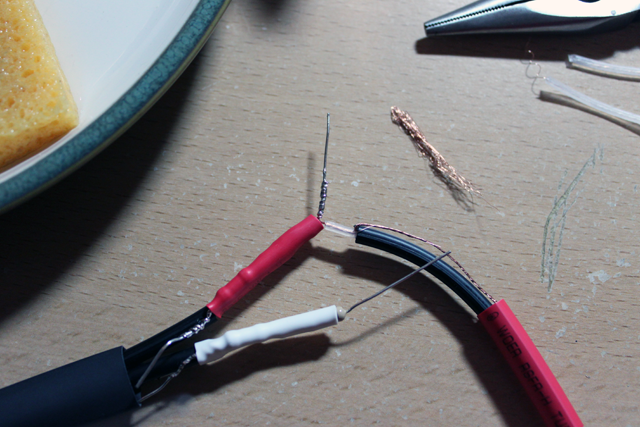
14. Cross the inner conductor of the RCA side with the resistor lead of the 1/8th in side as close to the resistor and inner conductor insulation as possible. Then wind the inner conductor around the resistor lead tightly. Finaly, solder the joint in the usual way by applying the tip of your soldering iron as far from the cable as possible to avoid melting the insulation.
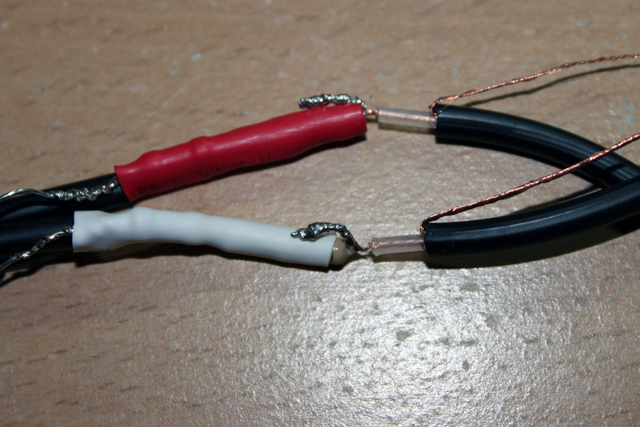
15. Bend the new solder joints down flat against the resister assemblies and clip off any excess resistor lead.
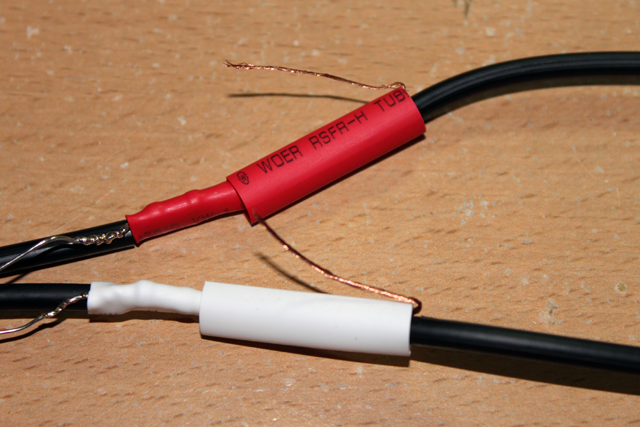
16. Slide the colored heat-shrink tubing down over the new joints so that it covers part of the resistor assembly and part of the outer jacket of the RCA cable ends. Bend the shield braid leads out at right angles as we did before to hold the heat-shrink tubing in place. Then go heat them up.
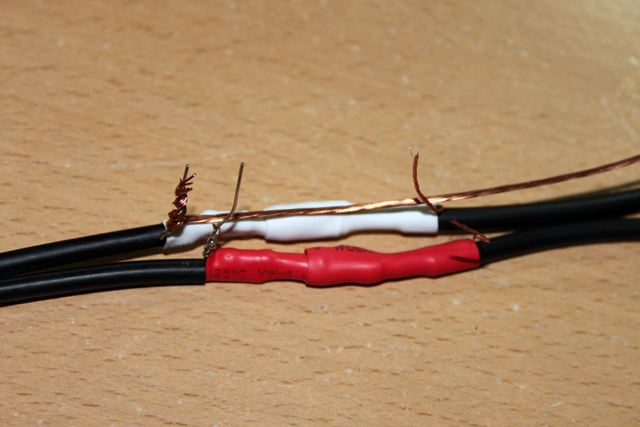
17. Now we’re going to connect the shield braids and build a shield for the entire assembly. This is important because these are unbalanced cables. Normally the shield braids provide a continuous electrical shield against interference. Since we’ve stripped that away and added components we need to replace it. We’ll start by making a good connection between the existing shield braids and then we’ll build a new shield to cover the whole assembly. Strip about 20 cm of insulation away from some stranded hookup wire and connect one end of it to the shield braid on one end of the L-Pad assembly. Lay the rest along the assembly for later.
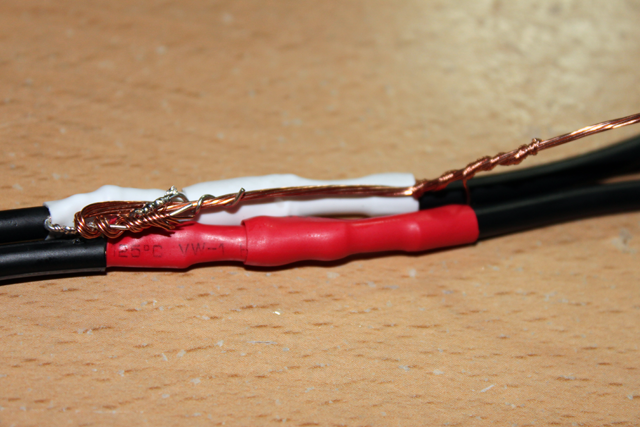
18. Connect the remaining shield braids to the bare hookup wire by winding them tightly. Keep the connections as neat as possible and laid flat across the resistor assembly.
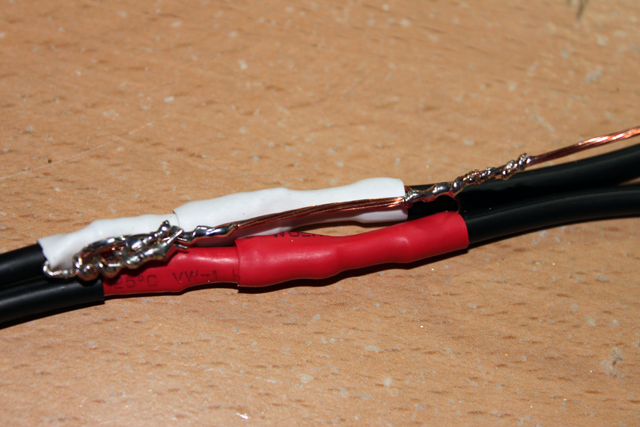
19. Solder the shield connections in place taking care not to melt the insulation as before.
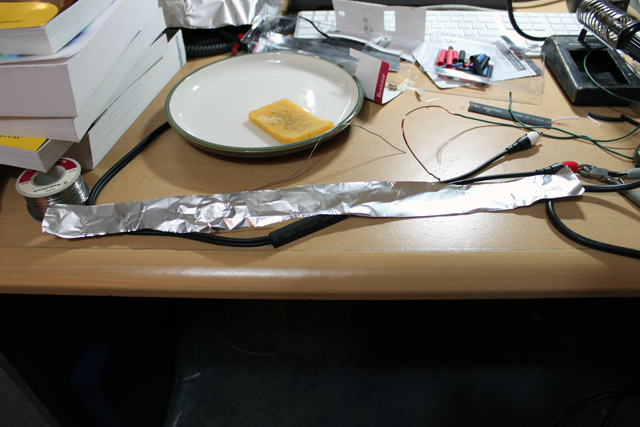
20. Cut a strip of ordinary aluminum foil about half a meter long and about 4 cm wide. This will become our new shield. It will be connected to the shields in the cable by the bare hookup wire we’ve used to connect them together.
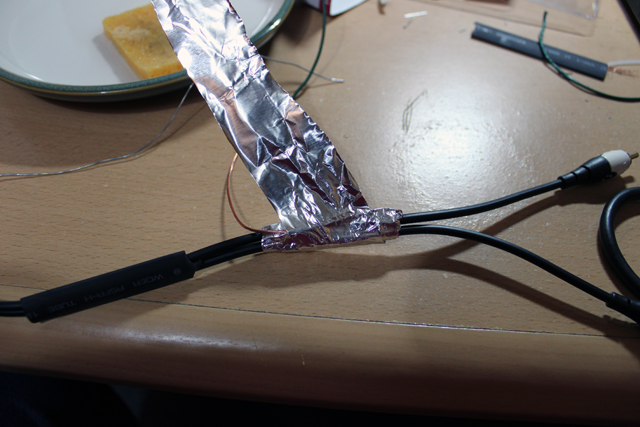
21. Starting at the end of the assembly away from the shield lead, wind a layer of foil around the assembly toward the shield lead. On each end of the assembly you want to cover about 5-10 mm of the existing cable so that the new shield overlaps the shield in the cable. When you reach that point on the end with the shield lead, fold the shield lead back over the assembly and the first layer of foil. Then, continue winding the foil around the assembly so that you make a second layer back toward where you started.
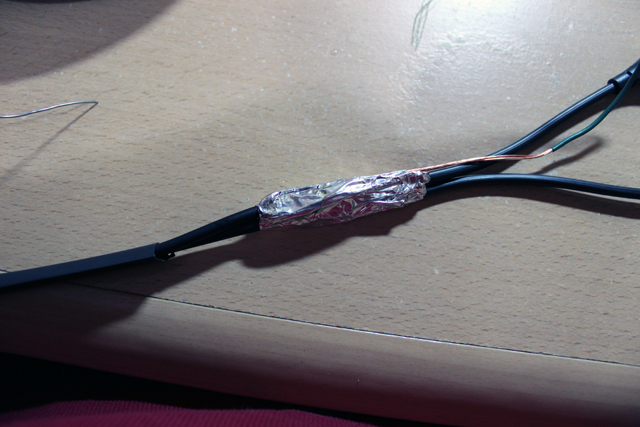
22. Continue winding the shield in this way back and forth until you run out of foil. Do this as neatly and tightly as possible so that the final assembly is compact and relatively smooth. You should end up with about 3-5 layers of foil with the shield lead between each layer. Finally, solder the shield lead to itself on each end of the shield and to the foil itself if possible.
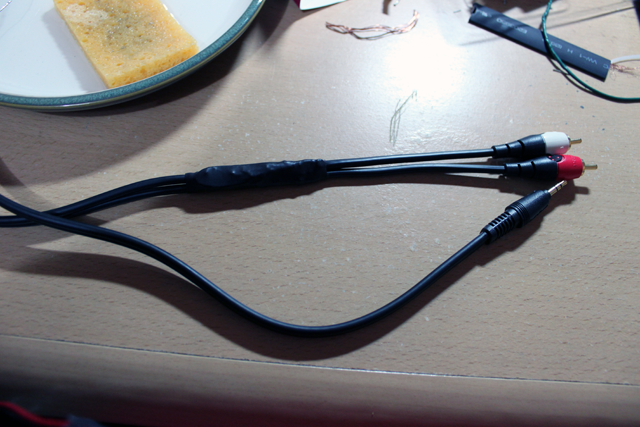
23. Clip off any excess shield lead. Then push (DO NOT PULL) the large heat-shrink tubing over the assembly. This may take a little time and effort, especially if the heat-shrink tubing is a little narrow. It took me a few minutes of pushing and massaging, but I was able to get the final piece of heat-shrink tubing over the shield assembly. It should cover about an additional 1 cm of cable on each end. Heat it up with your hair drier (or heat gun if you have it) and you’re done!

24. If you really want to you can do a final check with an ohm meter to see that you haven’t shorted anything or pulled a connection apart. If your assembly process looked like my pictures then you should be in good shape.

RCA tip to RCA tip should measure about 441K Ω (I got 436K).

RCA sleve to RCA ring should measure 0 Ω. (Shields are common).

RCA tip to RCA ring (same cable) should measure 220.5KΩ (I got 218.2K).

RCA sleve to 1/8th in sleve should measure 0 Ω.

RCA Red tip to 1/8th in tip should be about 220K Ω.

RCA Red tip to 1/8th in ring should be about 1K Ω more than that.
Sep 062010
 

If you know me then you know that in addition to music, technology, and all of the other crazy things I do I also have an interest in cosmology and quantum mechanics. What kind of a Mad Scientist would I be without that?

Recently while watching “Through the wormhole” with the boys I was struck by the apparent ratios between ordinary matter, dark matter, and dark energy in our universe.

Here is a link to provide some background: http://science.nasa.gov/astrophysics/focus-areas/what-is-dark-energy/

It seems that the ratio between dark matter and ordinary (observable) matter is about 5:1. That’s the 80/20 rule common in statistics and many other “rules of thumb” right?

Apparently the ratio between dark energy and all matter (dark or observable) is about 7:3. Here again is a fairly common ratio found in nature. For me it brings to mind (among other things) RMS calculations from my electronics work where Vrms = .707 * Vp.

There are also interesting musical relationships etc… The only thing interesting about any of those observations is that they stood out to me and nudged my intuition toward the  following thought:

What if dark energy and dark matter are really artifacts of ordinary reality and quantum mechanics?

If you consider the existence of a quantum multiverse then there is the “real” part of the universe that you can directly observe (ordinary matter); there is the part of reality that you cannot observe because it is bound to collapsed probability waves representing events that did not occur in your reality but did occur in alternate realities (could this be dark matter?); and there is the part of the universe bound up in wave functions representing future events that have yet to be collapsed in all of the potential realities (could this be dark energy?).

Could dark matter represent the gravitational influence of alternate realities and could dark energy represent the universe expanding to make room for all future potentialities?

Consider causality in a quantum framework:

When two particles interact you can consider that they observed each other – thus collapsing their wave functions. Subsequent events from the perspectives of those particles and those that subsequently interact with them record the previous interactions as history.

Another way to say that is that the wave functions of the particles that interacted have collapsed to represent an event with 100% probability (or close to it) as it is observed in the past. These historical events along with the related motions (energy) that we can predict with very high degrees of certainty make up the observable universe.

The alternative realities that theoretically occurred in events we cannot observe (but were predicted by wave functions now collapsed) might be represented by dark matter in our universe.

All of the possible future events that can be reasonably predicted are represented by wave functions in the quantum filed. These potential realities have been proved to be just as real as our observable universe by experiments in quantum mechanics and are generally represented by quantum entanglement effects etc.

Could it be that dark energy is bound up in (or at least strongly related to) the potentials represented by these wave functions?

Consider that the vast majority of particle interactions in our universe ultimately lead to a larger number of potential interactions. There is typically a one-to-many relationship between any present event and possible future events. If these potential interactions ultimately occur in a quantum multiverse then they would represent an expanded reality that is mostly hidden from view.

Consider that the nature of real systems we observe is that they tend to fall into repeating patterns of causality such as persistent objects (molecules, life, stars, planets, etc)… this tendency toward recurring order would put an upper bound on the number of realities in the quantum multiverse and would tend to stabilize the ratio of alternate realities to observable realities.

Consider that the number of potential realities derived from the wave functions of the multiverse would have a similar relationship and that this relationship would give rise to a similar (but likely larger) ratio as we might be seeing in the ratio of dark energy to dark matter.

Consider that as our universe unfolds the complexity embodied in the real and potential realities also expands. Therefore if these potentialities are related to dark matter and dark energy and if dark energy is bound to the expansion of the universe in order to accommodate these alternate realities then we would expect to see our universe expand according to the complexity of the underlying realities.

One might predict that the expansion rate of the universe might be related mathematically to the upper bound of the predictable complexity of the universe at any point in time.

The predictable complexity in the universe would be a function of the kinds of particles and their potential interactions as represented by their wave functions with the upper limit being defined as the potentiality horizon.

Consider that each event gives rise to a new set of wave functions representing all possible next events. Consider that if we extrapolate from those wave functions a new set of wave functions that represent all of the possible events after those, and so on, that the amplitudes of the wave functions at each successive step would be reduced. The amplitude of these wave functions would continue to decrease as we move our predictions into the future until no wave function has any meaningful amplitude. This edge of predictability is the potentiality horizon.

The potentiality horizon is the point in the predictable future where the probability of any particular event becomes effectively equal to the probability of any other event (or non event). At this point all wave functions are essentially flat — this “flatness” might be related to the Planck constant in such a way that the amplitude of any variability in any wave function is indistinguishable from random chance.

Essentially all wave functions at the potentiality horizon disappear into the quantum foam that is the substrate of our universe. At this threshold no potential event can be distinguished from any other event. If dark energy is directly related to quantum potentiality then at this threshold no further expansion of the universe would occur. The rate of expansion would be directly tied to the rate of expansion of quantum potentiality and to the underlying complexity that drives it.

So, to summarize:

What if dark matter and dark energy represent the matter and energy bound up in alternate realities and potential realities in a quantum multiverse?

If dark matter represents alternate realities invisible to us except through the weak influence of their gravity, and if dark energy represents the the expansion of the universe in order to accommodate the wave functions describing possible future events in the quantum field for all realities (observable and unobservable) with an upper bound defined by the potentiality horizon; then we might predict that the expansion rate of the universe can be related to it’s inherent complexity at any point in time.

We might also predict that the flow of time can be related to the inherent complexity of the wave functions bound in any particular system such that a lower rate of events occurs when the inherent complexity of the system is reduced.

… well, those are my thoughts anyway 😉

Jul 032010
 

I’m not one of “those” guys, really. You know the ones — the zealots who claim that their favorite OS or application is and will be forever more the end-all-be-all of computing.

As a rule I recommend and use the best tool for the job – whatever that might be. My main laptop is Windows XP, my family and customers use just about every recent version of Windows or linux.  In fact, my own servers are a mix of Win2k*, RedHat, CentOS, and Ubuntu, my other laptop is Ubuntu and I switch back and forth between MSOffice and OpenOffice as needed.

Today surprised me though. I realized that I had become biased against Ubuntu in a very insidious way— My expectations were simply not high enough. What’s weird about that is that I frequently recommend Ubuntu to clients and peers alike, and my company (MicroNeil in this case) even helps folks migrate to it and otherwise deploy it in their infrastructure! So how could I have developed my negative expectations?

I have a theory that it is because I find I have to defend myself from looking like “one of those linux guys” pretty frequently when in the company of my many “Windows-Only” friends and colleagues. Then there are all those horror stories about this or that problem and having to “go the long way around” to get something simple to work. I admit I’ve been stung by a few of those situations in the past myself.

But recently, not so much! Ubuntu has worked well in many situations and, though we tend to avoid setups that might become complicated, we really don’t miss anything by using it – and neither do the customers we’ve helped to migrate. On the contrary, in fact, we have far fewer problems with our Ubuntu customers than with our Windows friends.

Today’s story goes like this.

We have an old Toshiba laptop that we use for some special tasks. It came with Windows XP pro, and over the years we’ve re-kicked it a few times (which is sadly still a necessary evil from time to time on Windows boxen).

A recent patch caused this box to become unstable and so we were looking at having to re-kick it again. We thought we might take the opportunity to upgrade to Windows 7. We wanted to get it back up quickly so we hit the local store and purchased W7pro.

The installation was straight forward and since we already have another box running W7 our expectations were that this would be a non-event and all would be happy shortly.

But, no. The first thing to cause us trouble was the external monitor. Boot up the laptop with the monitor attached and that is all you can see — the laptop’s screen was not recognized. Boot up without the external monitor and the laptop’s is the only display that will work. I Spent some time searching various support forums for a solution and basically just found complaints without solutions.

After trying several of the recommended solutions without luck I was ready to quit and throw XP back on the box. Instead I followed a hunch and forced W7 to install all of the available patches just to see if it would work. IT DID!

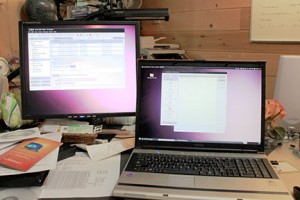
Or, it seemed like it did. After the updates I was able to turn on the external display and set up the extended desktop… I was starting to feel pretty good about it. So I moved on to the printer. (more about the display madness later)

We have a networked HP2840 Printer/Scanner. We use it all the time. Joy again, I discovered, the printer was recognized and installed without a hitch. Printed the test page. We were going to get out of this one alive (still have some day left).

Remember that scene in perfect storm — They’re battered and beaten and nearly at the end. The sky opens up just a bit and they begin to see some light. It seems they’ve made it and they’re going to survive. Then the sky closes up again and they know they are doomed.

W7 refused to talk to the scanner on the HP2840. That’s a game changer in this case — the point of this particular laptop is accounting work that requires frequent scanning and faxing so the scanner on the HP2840 simply had to work or we would have to go back to XP.

Again I searched for solutions and found only unsolved complaints. Apparently there is little to no chance HP is going to solve this problem for W7 any time soon — at least that is what is claimed in the support forums. There are several workarounds but I was unable to make them fly on this box.

Remember the display that seemed to work? One of the workarounds for the scanner required a reboot. After the reboot the display drivers forgot how to talk to the external display again and it wouldn’t come back no matter how much I tweaked it!

Yep– like in perfect storm, the sky had closed and we were doomed. Not to mention most of the day had evaporated on this project already and that too was ++ungood.

We decided to punt. We would put XP Pro back on the box and go back to what we know works. I suggested we might try Ubuntu– but that was not a popular recommendation under the circumstances… Too new an idea, and at this point we really just wanted to get things working. We didn’t want to open a new can of worms trying to get this to work again with the external monitor, and the printer, and the scanner, and…

See that? There it is– and I bought into it even though I knew better. We dismissed the idea of using Ubuntu because we expected to have trouble with it– But we shouldn’t have!

None the less… that was the decision and so Linda took over and started to install XP again… but there was a problem. XP would not install because W7 was already on the box. (The OS version on the hard drive is newer). So much for simple.

Back in the day we would simply wipe the partition and start again — these days that’s not so easy… But, it’s easy enough. I grabbed an Ubuntu disk and threw it into the box. The idea was to let the Ubuntu install repartition the drive and then let XP have at it — Surely the XP install would have no qualms about killing off a linux install right?!

In for a penny, in for a pound.

As the Ubuntu install progressed past the repartitioning I was about to kill it off and throw the XP disk in… but something stopped me. I couldn’t quite bring myself to do it… so I let it go a little longer, and then a little longer, and a bit more…

I thought to myself that if I’ve already wasted a good part of the day on this I might as well let the Ubuntu install complete and get a feel for how much trouble it will be. If I ran into any issues I would throw the XP disk in the machine and let it rip.

I didn’t tell Linda about this though — she would have insisted I get on with the XP install, most likely. After all there was work piled up and this non-event had already turned into quite a time waster.

I busied myself on the white-board working out some new projects… and after a short time the install was complete. It was time for the smoke test.

Of course, the laptop sprang to life with Ubuntu and was plenty snappy. We’ve come to expect that.

I connected the external monitor, tweaked the settings, and it just plain worked. I let out a maniacal laugh which attracted Linda from the other end of the MadLab. I was hooked at this point and so I had to press on and see if the printer and scanner would also work.

It was one of those moments where you have two brains about it. You’re nearly convinced you will run into trouble, but the maniacal part of your brain has decided to do it anyway and let the sparks fly— It conjured up images of lightning leaping from electrodes, maniacal laughter and a complete disregard for the risk of almost certain death in the face of such a dangerous experiment! We pressed on…

I attempted to add the printer… Ubuntu discovered the printer on the network without my help. We loaded up the drivers and printed a test page. More maniacal laughter!

Now, what to do about the scanner… surely we are doomed… but the maniacal part of me prevailed. I launched simple scanner and it already knew about the HP2840. Could it be?! I threw the freshly printed test page into the scanner and hit the button.

BEAUTIFUL!

All of it simply worked! No fuss. No searching in obscure places for drivers and complicated workarounds. It simply worked as advertised right out of the box!

Linda was impressed, but skeptical. One more thing, she said. “We have to map to the SAN… remember how much trouble that was on the other W7 box?” She was right – that wasn’t easy or obvious on W7 because the setup isn’t exactly what W7 wants to see and so we had to trick it into finding and connecting to the network storage.

I knew better at this point though. I had overcome my negative expectations… With a bit of flare and confidence I opened up the network places on the freshly minted Ubuntu laptop and watched as everything popped right into place.

Ubuntu to the Rescue

In retrospect I should have known better from the start. It has been a long time since we’ve run into any trouble getting Ubuntu (or CentOs, or RedHat…) to do what we needed. I suppose that what happened was that my experience with this particular box primed me to expect the worst and made me uncharacteristically risk averse.

  • XP ate itself after an ordinary automatic update.
  • W7 wouldn’t handle the display drivers until it was fully patched.
  • W7 wouldn’t talk to the HP2840 scanner.
  • Rebooting the box made the display drivers wonky.
  • XP wouldn’t install with W7 present.
  • I’d spent hours trying to find solutions to these only to find more complaints.
  • Yikes! This was supposed to be a “two bolt job”!!!

Next time I will know better. It’s time to re-think the expectations of the past and let them go — even (perhaps especially) when they are suggested by circumstances and trusted peers.

Knowing what I know now, I wish I’d started with Ubuntu and skipped this “opportunity for enlightenment.” On the other hand, I learned something about myself and my expectations and that was valuable too, if a bit painful.

However we got here it’s working now and that’s what matters 🙂

Ubuntu to the rescue!

Jun 142010
 

I was pondering the oil spill in the Gulf, my work in automata, my fascination with robotics, and my friends with boats in Pensacola. Then I had another one of my crazy ideas — Hopefully it’s crazy enough to attract some interest and maybe even get done — so I thought I’d share. (That’s what blogs are for right?!)

What if we (collectively) develop an open source project to build (or refit) a fleet of small autonomous boats to patrol the Gulf looking for oil to collect and separate from the water. Here are the key points:

  • The craft are small and slow moving so they are not dangerous. They should be just large enough to carry a useful amount of collected oil, and just fast enough to get out of their own way and survive in the ocean.
  • The control systems are a collection of relatively simple, dedicated, open-source components designed to fail safe. If one subsystem doesn’t get what it expects from another subsystem then the robot stops and waits (signals) for help. More sophisticated systems can interact with the simpler control subsystems for exotic behaviors– but the basics would be very close to “hard-wired” reflexes.
  • Broken parts can be easily swapped out. Upgrades are equally easy to deploy by replacing swappable components with better ones.
  • Each is equipped with a centrifuge and a scoop/skimmer. It’s instincts are to seek out oil on the surface and turn on it’s skimmer while it slowly moves through that patch of ocean. The centrifuge separates the oil from the water. The water goes back in the ocean, the oil goes into the tank.
  • When a robot finds oil it tells it’s friends via radio using GPS to identify it’s location. Along the way it can gather other data that it can get for free from it’s control system’s sensors such as temperature, wind data, an any other data from attached sensors.
  • The instincts of the robots are based on a collection of simple behaviors and reflexes (more later).
  • Each has an open tank in back where the separated oil is deposited. When the robot detects that it’s tank is sufficiently full (or that it otherwise needs service/fuel) it will drive toward a barge where it will wait in line for it’s tank to be pumped out and it’s fuel tank to be topped off.
  • It might even be possible to make solar powered versions that do not require fuel — they would sleep at night. This kind of thing might also be a backup system to get the robot to safety in case of a main engine failure.
  • Endurance and autonomous operation are key design goals. These do not need to be (nor do we want them to be) big or fast or even particularly efficient. The benefit comes from their numbers, their small size, their ability to collaborate with each other, and their “always on” attitude. Since they work all the time and do not require human intervention they do not have to be powerful— just persistent. Their numbers and distribution are what gets the job done.
  • Since the robots are unmanned there is little exposure hazard for people (or animals). Robots don’t get sick — they may break down, but they don’t care how toxic their environment is during or after they do their job. These in particular are ultimately disposable if they need to be.
  • The subsystems should be designed so that they can be used in purpose built craft or deployed in existing craft that are re-purposed for the task.

Instincts (Roughly in order of priority):

  • Robots prefer to keep their distance from anything else on the surface of the water. They can do this with simple visual systems (or expensive LIDAR, or whatever folks dream up to put on their bot). Basically, if it doesn’t look like water they don’t want to be near it — unless, perhaps, it’s oil on top of water.
  • Robots prefer to stay within a minimum depth of water. The more shallow the water gets the more the robot wants to be in deeper water. The safety limits for this can be partially enforced by separate sub-systems but the primary goal is for the robots instincts and natural behaviors to automatically achieve the safety goals “as a matter of habit.”
  • Robots like to be closer to other robots that are successful — but not closer than the safe distance described earlier. If they get too close to something then the prior rule takes over. This allows the robots to flock on a patch of oil without running into each other. They will also naturally separate themselves in a pattern that optimizes their ability to collect oil from that patch. As a matter of safety they will also stay away from other vessels even (perhaps especially) if they don’t act like other robots.
  • Robots like to be in places they have not been before. This instinct causes them to search in new places for oil.
  • If a robot can’t get close enough to a patch of oil because other robots have already flocked there then the robot will eventually stop trying and will go search somewhere else.
  • Robots like to be closer to shore (but not too close -see above) rather than farther away. This gives the robots a tendency to concentrate on oil that is threatening the coast and also minimizes the possibility that the robot will be lost in the deeper ocean. Remember the other rule above about keeping their distance from everything— that will keep them from getting too close to shore too. “Close to something” includes being in water that is too shallow.
  • Robots shut down if anything gets too close to them. So, if they malfunction and get close to something else, OR, of someone else gets close to them then their instinct is to STOP. This behavior allows authorities to approach a robot safely at any time for whatever purpose.

What I envision here is something that can be mass produced easily by anybody with the will and facilities to do it. All of the hardware and software components would be open-sourced so that they can be refined through experience and enhanced by everyone who is participating.

It seems to me that the problem with the oil that is already in the Gulf is that it is spread over a very wide area and it is broken up into lots of small patches that are too numerous to track and manage from a central location.

A fleet of robust, inexpensive, safe, autonomous skimmers would be able to collectively solve this problem through a distributed intelligence. Along the way the same fleet would be able to provide a tremendous amount of information about conditions that is currently not available.

The design is simple, and the craft are expendable. Since each is collecting oil that is in the water, and shouldn’t be, if there is a catastrophic failure of a robot and it sinks then the result is that the oil it collected is back in the water. Not great, but also not worse than it was before the oil was collected in the first place.

If this idea catches on then I believe we (collectively) could produce huge numbers of these in a very short time – and each one would contribute to solving a problem that is currently not solvable. Also, as the technology is refined, the same systems would be available for any similar events that occur later… After all, the world is not going to stop drilling for oil in the deep oceans (or elsewhere) until it is all but gone. That is an unfortunate fact, in my opinion, but a fact none the less.

I believe also that the technology that would be developed through the creation of this fleet and the subsystems that support it would be useful for many other purposes as well… ranging from automated search and rescue to border patrol and anti-terrorism efforts.

This is a rough draft taken from the back of the envelope.

Let me know what you think!

I would love to work on a project like this. 🙂

I would love even more to see LOTS of folks working on this.

PS. Just before pushing the button I had another idea… (as I often do). What if the robots also had behaviors that allowed them to bucket-brigade oil toward collection points. So… if a slow moving robot could not possibly make it out to the barge from it’s station near the shore it would instead make a trip toward the barge and upon meeting up with one of it’s buddies it could hand it’s cargo off— Consider a kind of dance— the bot giving leads the bot that’s accepting — it dumps it’s cargo into the water just ahead of it’s buddy and it’s buddy scoops it up. At the very least the oil is farther from shore, and at best most of the transfer is completed safely without any single robot needing the range or speed required to make the entire trip to the collection point… In fact, this could be the primary mechanism— bots could dump their cargo in a collection area – a safe distance from the barge. Then other specialized equipment could safely collect it from there…

Apr 282010
 

No, I’m not kidding…

Race Conditions are evil right?! When you have more than one thread racing to use a piece of shared data and that data is not protected by some kind of locking mechanism you can get intermittent nonsensical errors that cause hair loss, weight gain, and caffeine addiction.

The facts of life:

Consider a = a + b; Simple enough and very common. On the metal this works out to something like:

Step 1: Look at a and keep it in mind (put it in a register).
Step 2: Look at b and keep it in mind (put it in a different register).
Step 3: Add a and b together (put that in a register).
Step 4: Write down the new value of a (put the sum in memory).

Still pretty simple. Now suppose two threads are doing it without protection. There is no mutex or other locking mechanism protecting the value of a.

Most of the time one thread will get there first and finish first. The other thread comes later and nobody is surprised with the results. But suppose both threads get there at the same time:

Say the value of a starts off at 4 and the value of b is 2.

Thread 1 reads a (step 1).
Thread 2 reads a (step 1).
Thread 1 reads b (step 2).
Thread 2 reads b (step 2).
Thread 1 adds a and b (step 3).
Thread 2 adds a and b (step 3).
Thread 1 puts the result into a (step 4).
Thread 2 puts the result into a (step 4).
Now a has the value 6.

But a should be 8 because the process happened twice! As a result your program doesn’t work properly; your customer is frustrated; you pull out your hair trying to figure out why the computer can’t add sometimes; you become intimately familiar with the pizza delivery guy; and you’re up all night pumping caffeine.

This is why we are taught never to share data without protection. Most of the time there may be no consequences (one thread starts and finishes before the other). But occasionally the two threads will come together at the same time and change your life. It gets even stranger if you have 3 or more involved!

The trouble is that protection is complicated: It interrupts the flow of the program; it slows things down; and sometimes you just don’t think about it when you need to.

The story of RTSNF and MPPE:

All of this becomes critical when you’re building a database. I’m currently in the midst of adapting MicroNeil’s Multi-Path Pattern Engine (MPPE) technology for use in the Real-Time Message Sniffer engine (RTSNF).

RTSNF will allow us to scan messages even faster than the current engine which is based on MicroNeil’s folded token matrix technology. RTSNF will also have a smaller memory footprint (which will please OEMs and appliance developers). But the most interesting feature is that it will allow us to distribute new rules to all active SNF nodes within 90 seconds of their creation.

This means that most of the time we will be able to block new spam and virus outbreaks and their variants on all of our customer’s systems within 1 minute of when we see a new piece of spam or malware in our traps.

It also means that we have to be able to make real-time incremental changes to each rulebase without slowing down the message scanning process.

How do you do such a thing? You break the rules!

You’re saying race conditions aren’t evil?? You’re MAD!
(Yes, I am. It says so in my blog.)

Updating a database without causing corruption usually requires locking mechanisms that prevent partially updated data from being read by one thread while the data is being changed by another. If you don’t use a locking mechanism then race conditions virtually guarantee you will have unexpected (corrupted) results.

In the case of MPPE and RTSNF we get around this by carefully mapping out all of the possible states that can occur from race conditions at a very low level. Then we structure our data and our read and write processes so that they take advantage of the conditions we have mapped without producing errors.

This eliminates “unintended” part of the consequences and breaks the apparent link between race conditions and certain disaster. The result is that these engines never need to slow down to make an update. Pattern scans can continue at full speed on multiple threads while new updates are in progress.

Here is a simplified example:

Consider a string of symbols: ABCDEFG

Now imagine that each symbol is a kind of pointer that stands in for other data — such as a record in a database or a field in a record. We call this symbolic decomposition. So, for example, the structure ABCDEFG might represent an address in a contact list. The symbol A might represent the Name, B the box number, C the street, D the city, etc… Somewhere else there is a symbol that represents the entire structure ABCDEFG, and so on.

We want to update the record that is represented by D without first locking the data and stopping any threads that might read that data.

Each of these symbols are just numbers and so they can be manipulated atomically. When we tell the processor to change D to Q there is no way that processor or any other will see something in-between D and Q. Each will only see one or the other. With almost no exceptions you can count on this being the case when you are storing or retrieving a value that is equal in length to the processor’s word size or shorter. Some processors (and libraries) provide other atomic operations also — but for our purposes we want to use a mechanism that is virtually guaranteed to be ubiquitous and available right down to the machine code if we need it.

The trick is that without protection we can’t be sure when one thread will read any particular symbol in the context of when that symbol might be changed. So we have two possible outcomes when we change D to Q for each thread that might be reading that symbol. Either the reading thread will see the original D or it will see the updated Q.

This lack of synchronization means that some of the reading threads may get old results for some period of time while others get new results. That’s generally a bad thing at higher levels of abstraction such as when we are working with serialized transactions. However, we are working at a very low level where our application doesn’t require serialization. Note also that if we did need to support serialization at a higher level we could do that by leveraging these techniques to build constructs that satisfy those requirements.

So we’ve talked about using symbolic decomposition to represent our data. Using symbolic decomposition we can make changes using ubiquitous atomic operations (like writing or reading a single word of memory) and we can predict the outcomes of the race conditions we allow. This means we can structure our application to account for these conditions without error and therefore we can skip conventional data protection mechanisms.

There is one more piece to this technique that is important and might not be obvious so I’ll mention it quickly.

In order to leverage this technique you must also be very careful how you structure your updates. The updates must remain invisible until they are complete. Only the thread making the update should know anything about the change until it’s complete and ready to be posted. So, for example, if we want to change the city in our address that operation must be done this way:

The symbols ABCDEFG represent an address record in our database.
D represents a specific city name (a string field) in that record.

In order to change the city we first create a new string in empty space and represent that with some new symbol.

Q => “New City”

When we have allocated the new string, loaded the data into it, and acquired the new symbol we can swap it into our address record.

ABCDEFG becomes ABCQEFG

The entire creation of Q, no matter how complex that operation may be, MUST be completed before we make the higher level change. That’s a key ingredient to this secret sauce!

Now go enjoy breaking some rules! You know you want to 🙂

Mar 232010
 

The Direct Sound EX-29, extreme isolation headphones absolutely live up to the hype. Bleed is non-existent; they are comfortable; they are clear; and they are very quiet. I’ve been using these in the studio for a few days now and I don’t know how I ever lived without them. Really- they are that good!

I try to spend a good deal of time behind the kit if I can swing it – just for fun, but also working out drum tracks for new songs, and of course, recording new material. These headphones shine in all of these applications.

Just Jammin’:

When I’m just jammin’ and keeping my chops up these cans help me keep everything at a sane volume which means I can work longer without fatigue and without damaging my hearing. In the past I have used ear plugs of various types and they have all had a few critical drawbacks that the EX-29s don’t. Two that spring to mind are comfort and clarity.

[ What do you mean “clarity”… ear protection isn’t supposed to be clear anyway! ] I MEAN- ear plugs aren’t clear – ever! At least not in my experience. Nor are most other practical solutions.

If you’ve spent any serious time (multi-hour sessions) behind the kit with ear plugs you know what I’m talking about — You can’t hear what you’re doing and it really takes a toll on your subtlety. Most likely you got frustrated at some point and flicked the ear plugs across the room so you could hear again. (You did have them in at first didn’t you??!)

The EX-29s surprisingly don’t have this problem. One of the first things I noticed was how flat the attenuation was. After a few minutes in the relative quiet of the EX-29s I adapted and was able to hear everything – just at a lower level. This means I don’t lose crush rolls, ghost strokes, and cymbal shading for the sake of my hearing. Don’t get me wrong — it’s not perfect 🙂 but it is worlds better than any ear plugs I’ve ever used and the translation of subtlety has a big pay-off in that I don’t suffer any fatigue from trying too hard to hear what I’m doing.

Then there’s comfort. Of course phones of any kind are going to be more comfortable than plugs… but the EX-29s do better than that. They are truly comfortable even after more than a couple of hours. They don’t squeeze your head, and they lack that pillows-on-the-ears feeling that typically comes with good protection.

Writing:

When I’m working out new drum tracks I often spend hours trying things out. That means playing back scratch tracks, samples, and loops and playing along to find the right grooves and fills. I used to use my Sony MDR-V600s for this. I would try to keep things at a low level, or I might use a bit of cotton (if I thought of it)… but invariably things would eventually get out of control or I would get tired from fighting with it and would have to come back later.

The EX-29s have solved this problem for me. I don’t miss any of the clarity I get from my V600s AND I don’t need any cotton for the ears :-).

The first thing I noticed when I used the EX-29s was that I had to turn my Furman monitor system way down! (ok, 2-3 notches) Everything was still clear, and I could hear my playing along with the playback without struggling to adjust to unnatural muffling. Even better – I didn’t get frustrated with it and discard my protection!

Recording:

Recording sessions are where the EX-29s really come through. Once the mics are on and every sound matters there are several things that shine about the EX-29s. In no particular order:

The isolation is absolutely fantastic! I frequently play pieces that demand a lot of dynamic range (I’m an art-rock guy at heart). It’s surprising how sensitive the mics need to be when you want to capture the subtlety of such a loud instrument. Any bleed-through from the playback can destroy the subtlety of a quiet passage by forcing re-takes or necessitating the use of gating, expansion, and other trickery. It’s no wonder drums are so frequently sequenced these days– it boils down to time and effort (which means money).

The EX-29s truly solve the isolation problem in two ways. The attenuation of the shells is quite substantial but in addition to that the quality of the drivers is also fantastic! This combination means that you can achieve comfort and clarity at substantially reduced playback levels. Not only is your playback not likely to get into your mics, but it is also at a much lower level to begin with.

Do the math (I did) — you not only drop about 30db getting from the inside of the EX-29s to the outside; you also drop an additional 12-15db using lower levels in the first place. That’s 45db of effective isolation without struggling to adapt or building up fatigue trying to “hear it”. Compare that to what you’re doing now and chances are you’ll see a 20db advantage with the EX-29s – not to mention more comfortable and productive recording sessions.

I’ll admit it – When I first heard about the EX-29s I was more than a little skeptical. They just seemed too good to be true. When I finally broke down and ordered them it was with the attitude that I’d give them a shot and if (when) they didn’t quite cut it I would find some other use for them.

No longer – These EX-29s are the real deal. They have earned a permanent home in my studio. I’m glad I picked up the extra pair to hang on my book shelf so we won’t have to fight over who gets to use them 🙂

Mar 042010
 

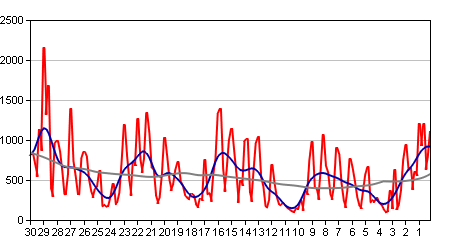
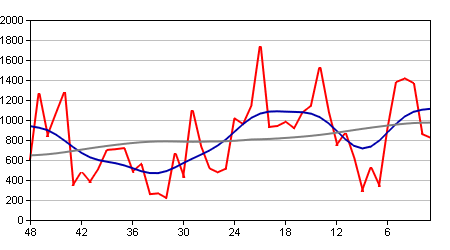
Those trixy blackhatzes are making a real mess of things these days. The last day or so in particular has been a festival of hacked servers and exploited free-hosting sites. Just look at this graph from our soon-to-be-launched Spam-Weather site:


While spammers have always enjoyed exploiting free services they have been particularly busy at it the last few days. The favorites this time around have been webstarts and doodlekits. What makes sites like these so attractive to the blackhats is that there is virtually no security on the sites. Anybody can sign up for a new account in minutes without any significant challenges. This means that the entire process can be scripted and automated by the blackhats.

After they’ve used one URL for a while (and it begins to get filtered) they simply light up another one, and so on, and so on.

Some email administrators are tempted to block all messages containing links to free hosting sites — and for some that might be an option — but for PROs like us it’s not. There are usually plenty of legitimate messages floating around with links to free-hosted web sites so blocking all such links would definitely lead to false positives (unacceptable).

At ARM we have a wide range of defenses against these messages so we’re able to block not only on specific links but also on message structures, obfuscation techniques, and other artifacts that are always part of these messages. In addition to that our tools also allow us to predict what the next round of messages might look like so that even when they do change things up we’re often ahead of them.

No mistake about it though… it’s hard work!

It would be _MUCH_ better for everyone if folks that offer free hosting and other commonly exploited services (like URL shortening, blog hosting,  and free email accounts) would do a better job keeping things secure.

Feb 062010
 

Just after we moved here a dozen or so years ago we had a snow storm that was pretty good. It was quite an adventure.

At one point I had to abandon our car in a grocery store parking lot and walk home. On the final stretch of that walk I tried to take a short cut down the hill behind our house and had to abandon the attempt and go around — the snow was up to my waist and 5 minutes of effort would get you only a few meters progress. — I could see the house, and Linda could see me.. we waved, and I turned around to walk the rest of the way on the roads which were just a little better.

The lentil soup w/ ham was amazingly good after that long walk home to our cozy house. We still try to recreate that experience from time to time.

This storm is bigger than that, but we’re not going out in it except to shovel a bit and have some fun. This time we’re well prepared and perhaps a little less adventurous.  The boys are having a blast — I hope they’re building some happy memories along with their snow forts. I’m sure they are.

In the midst of all this I can’t help but think of the homeless though. The sleeping bags MicroNeil purchased for TOP arrived on Friday. The original plan was for them to go to DC this weekend. The weather had other plans — We’ll push to get them delivered as soon as possible after the storm. I know the folks at TOP are anxious too.

As the snow falls outside my office window my mind drifts back to home, to the boys playing outside, to the beauty of it, and the memories we’ll make of it.

This kind of snow is the stuff of legend… the kind of thing that only happens around here once or twice in your childhood and maybe a few times in your life. That keeps it special. For folks who live much north of here it’s probably just another snowy day.

For us here in the mid-Atlantic it happens just often enough; and when it does it’s an opportunity for everyone to pause and reflect – to change their lives for a few days, talk to their neighbors, have a few adventures, and make some memories – stories they can share.

To quote Ernest T Bass: “I was right there in it!”

If you’re here in it with us, or otherwise in similar circumstances, we wish you well and hope all of your adventures ultimately turn into happy memories.

The rest is pictures…

Feb 032010
 

Noise, Noise, Noise, Noise! grumbled the Grinch… and I feel his pain. One of the challenges of building a recording studio is noise. We live in a very noisy world.
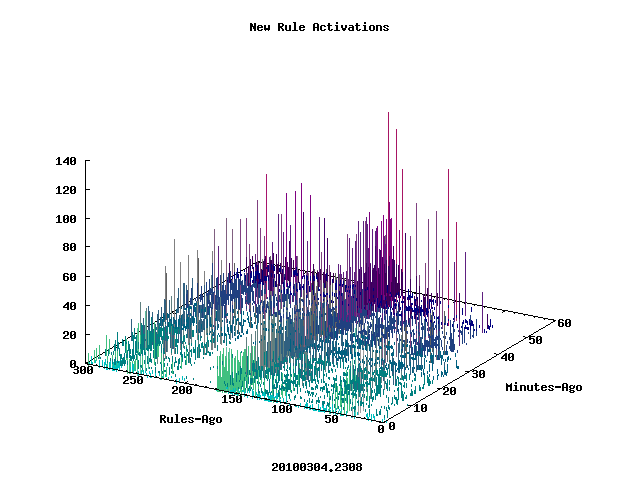
One way we deal with noise is to put noisy things in a special room which can be isolated from the recording environment. Here at the Mad Lab we have a utility room where we keep our server farm, CD/DVD production robot, air-handler, and other noisy things. The trick is: How do we keep all that stuff quiet?

There are two things we want to do to this room: Reduce the noise inside the room as much as possible and then prevent whatever is left over from leaking out.

The first step to treating the room was to significantly increase the density of the walls. At the same time we wanted to increase the structural integrity of the paneling on the opposite side. What we did was to add a thick, dense layer of work-bench material to the outside of the wall directly behind the paneling (another story we’ll post later).

The next step was to add sound absorbing material to the inside of the room to absorb as much noise as possible (and convert it to heat). The thinking behind this is that the more sound we can absorb the less sound there is to bounce around the room and leak out.

In addition we decided to put physics to work for us and install this material so that it is suspended from the studs flush with the inside of the wall leaving an air gap between the insulation and the outer wall material. This accomplishes two things. The insulation on the inside surface  is mechanically isolated from the outer wall structure thus preventing any (most) mechanical sound transmission. Also the air gap represents an additional change in density so that any sound attempting to travel through the wall from the inside experiences at least three separate mediums (more on this in a moment).

We did some research and contacted our friends at Sweetwater to purchase some Auralex mineral fiber insulation. Then to make it easier to handle we had our friends at Silk Supply Company precision cut the material and manufacture fabric covered panels.

The custom made panels fit perfectly between the studs and leave a gap of about half an inch between them and the dense outside wall. When sound attempts to escape through the wall three things happen.

First a lot of the energy is absorbed into the mineral fibers — the fabric covering is acoustically transparent. This significantly reduces any echos inside the room and converts a good portion of the sound to heat. This effect is enhanced by the loose mechanical coupling of the installation. Since the panels are suspended from the front surface of the studs any mechanical energy that might be transmitted through the studs is first significantly attenuated as it travels through the mineral fibers to the edges.

Second, any sound that makes it through the  insulation escapes into the air gap where the change in density causes the sound to refract… well, sort of. The size of the gap is very small compared to the wavelength of most sounds so most of the effect is really a mechanical decoupling of the mineral fiber and the hard surface of the outer wall material.

Third, much of the sound in the air gap is reflected back toward the mineral fiber by the smooth, hard surface of the outer wall material. In addition the density of the material further attenuates whatever is not reflected.

Since one of my goals was to attenuate the noise inside the room (and for a number of other reasons) I didn’t want to go the more conventional route of adding thick layers of drywall.

In line with this, the fabric covering has a few additional benefits. To start with the installation is much easier to install and if need be it can be temporarily removed by pulling the staples and tugging the insulation out of it’s slot. This might be useful if I need to run any additional cabling, for example. In addition to that the fabric reinforces the mineral fiber and keeps it well contained so it doesn’t sluff off into the room over time.

As usual I enlisted Ian and Leo to perform the installation. They had a lot of fun exploring the change in acoustic properties by alternately talking in front of sections where they had installed the panels and sections where the panels were not yet installed.

Jan 032010
 

We’re doing a lot of cross-platform software development these days, and that means doing a lot of cross-platform testing too.

The best way to handle that these days is with virtual computing since it allows you to use one box to run dozens of platforms (operating system and software configurations) at once – even simultaneously if you wish (and we do).

Until recently we were outsourcing this part of our operation but that turned out to be very painful. To date nobody in the cloud-computing game quite has the interface we need for making this work. In particular we need the ability to keep pristine images of platforms that we can load on demand. We also need the ability to create new reusable snapshots as needed.

All of this exists very nicely in VMWare, of course, but to access it you really need to have your own VMWare setup in-house (at least that’s true at the moment). So I ordered a new Dell Power Edge 2970 to run at the Mad Lab with ESXi 4.

Hey Leo - Install that for me

Hey Leo - Install that for me

Around the Mad Lab we like to take every opportunity to teach, learn, and experiment so I enlisted Leo to get the server installed.

The first thing that occurred to me after it arrived is that it’s big and heavy. We have a rack in the lab from our old data center in Sterling, but it’s one of the lighter-duty units so some “adaptation” would be required. Hopefully not too much.

Mad Rack before the new server

Mad Rack before the new server

Another concern that I had is that this server might be too loud. After all, boxes like this are used to living in loud concrete and steel buildings where people do not go. I need to run this box right next to the main tracking room in the recording studio. No matter though – it must be done, and I’ve gotten pretty good at treating noisy equipment so that it doesn’t cause problems. In fact, the rack lives in a special utility room next to the air handler so everything I do in there to isolate that room acoustically will help with this too.

Opening the box we quickly discovered I was right about the size. The rail kit that came with the device was clearly too large for the rack. We would have to find a different solution.

The server itself would stick out the back of the rack a bit so I had Leo measure it’s depth and check that against the depth we had available in the rack.

As it turned out we needed to move the rack forward a bit in order to leave enough space behind it. The rack is currently installed in front of a structural column and some framing. Once Leo measured the available distance we moved the rack forward about 8 inches. That provided plenty of space for the new server and access to it’s wiring.

Gosh those rails look big

Gosh those rails look big

How long is it?

How long is it?

Must move the rack to make room

Must move the rack to make room

That solved one problem but we still had the issue of the rails being too long for the rack. Normally I might take a hack saw to them and modify them to fit but in this case that would not be possible – and besides: the rail kit from Dell is great and we might use it later if we ever move this server out of the Mad Lab and into one of the data centers.

Luckily I’d solved this problem before and it turned out we had the parts to do it this time as well. Each of these slim-line racks has a number of cross members installed for ventilation and stability. These are pretty tough pieces of kit though so they can be used in a pinch to act as supports for the front and back of a long server like this. Just our luck we had two installed – they just needed to be moved a bit.

I explained to Leo how the holes are drilled in a rack, the concept of “units” (1-U, 2-U, etc), and where I wanted the new server to live. Leo measured the height and Ian counted holes to find the new locations for the front and back braces.

Use these braces instead of rails

Use these braces instead of rails

Teamwork

Teamwork

Then Leo held the cabling back while I loaded the new server into the rack. We keep power cables on the left side and signal cables on the right (from the front). The gap between the sides and the rails makes for nice channels to keep the cabling neat… well, ok, neat enough ;-). If this rack were living in a data center then it wouldn’t be modified very often and all of the cables would be tightly controlled. This rack lives at the Mad Lab where things are frequently moved around and so we allow for a little more chaos.

Once the server is over the first brace it’s easy to manage. In fact, it’s pretty light as servers go. This kind of thing can be done with one person but it’s always best to have a helper.

Power Left, Signals Right

Power Left, Signals Right

Slides right in with a little help

Slides right in with a little help

Once the server was in place we tightened up the thumb screws on the front. If the braces weren’t in the right place this wouldn’t have worked because the screw holes wouldn’t have aligned. Leo and Ian had it nailed and the screws mated up perfectly.

Tighten the left thumb screw

Tighten the left thumb screw

Tighten the right thumb screw

Tighten the right thumb screw

With the physical installation out of the way it was time to wire up the beast. It’s a bit dark in the back of the rack so we needed some light. Luckily this year I got one of the best stocking stuffers ever – a HUGlight.

The LEDs are bright and the bendable arms are sturdy. You can bend the thing to hang it in your work area, snake it through holes to put light where you need it, stand it on the floor pointing up at your work… The possibilities are endless. Leo thought of a way to use it that I hadn’t yet – he made it into a hat!

HUGLight - Best stocking stuffer ever!

HUGLight - Best stocking stuffer ever!

Leo wears HUGlight like a hat

Leo wears HUGlight like a hat

Once the wiring was complete I threw the keyboard and monitor on top, plugged it in, and pushed the button (smoke test). Sure enough, as I feared, the server sounded like a jet engine when it started up. For a moment it was the loudest thing in the house and clearly could not live there next to the studio if it was going to be that loud… either that or I would have to turn it off from time to time, and I sure didn’t want to do that.

Then after a few seconds the fans throttled back and it became surprisingly quiet! In fact it turns out that with the door of the rack closed and the existing acoustic treatments I’ve made to the room this server will be fine right where it is. I will continue to treat the room to isolate it (that project is only just beginning) but for now what we have is sufficient. What a relief.

Within a minute or two I had the system configured and ready for ESXi.

It Is Alive!

It Is Alive!

The keyboard and monitor wouldn’t be needed for long. One of the best decisions I made was to order the server with DRAC installed. Once it was configured with an IP address and connected to the network I could access the console from anywhere on my control network with my web browser (and Java). Not only that but all of the health monitors (and then some) are also available. It was well worth the few extra dollars it cost. I doubt I’ll ever install another server without it.

Back in the day we needed to physically lay hands on servers to restart them; and we had to use special software and hardware gadgets to diagnose power or temperature problems – up hill, both ways, bare feet, in the snow!! But I digress…

Mad Rack After

Mad Rack After

After that I installed ESXi, pulled out the disk and closed the door. I was able to perform the rest of the setup from my desk:

  • Configured the ESXi password, control network parameters, etc.
  • Downloaded vSphere client and installed it.
  • Connected to the ESXi host, installed the license key.
  • Setup the first VM to run Ubuntu 9.10 with multiple CPUs.
  • … and so on

The server has now been alive and doing real work for a few days and continues to run smoothly. In fact I’ve not had to go back into that room since except to look at the blinking lights (a perk).

We’re doing a lot of cross-platform software development these days, and that means doing a lot of cross-platform testing too.

The best way to handle that these days is with virtual computing since it allows you to use one box to run dozens of platforms (operating system and software configurations) at once – even simultaneously if you wish (and we do).

Until recently we were outsourcing this part of our operation but that turned out to be very painful. To date nobody in the cloud-computing game quite has the interface we need for making this work. In particular we need the ability to keep pristine images of platforms that we can load on demand. We also need the ability to create new reusable snapshots as needed.

All of this exists very nicely in VMWare, of course, but to access it you really need to have your own VMWare setup in-house (at least that’s true at the moment). So I ordered a new Dell Power Edge 2970 to run at the Mad Lab with ESXi 4.

(LeoInstallThatForMe)

Around the Mad Lab we like to take every opportunity to teach, learn, and experiment so I enlisted Leo to get the server installed.

The first thing that occurred to me after it arrived is that it’s big and heavy. We have a rack in the lab from our old data center in Sterling, but it’s one of the lighter-duty units so some “adaptation” would be required. Hopefully not too much.

(MadRackBefore)

Another concern that I had is that this server might be too loud. After all, boxes like this are used to living in loud concrete and steel buildings where people do not go. I need to run this box right next to the main tracking room in the recording studio. No matter though – it must be done, and I’ve gotten pretty good at treating noisy equipment so that it doesn’t cause problems. In fact, the rack lives in a special utility room next to the HVAC so everything I do in there to isolate that room acoustically will help with this too.

Opening the box we quickly discovered I was right about the size. The rail kit that came with the device was clearly too large for the rack. We would have to find a different solution.

(GoshThoseRailsLookBig)

Clearly the server itself would stick out the back of the rack a bit so I had Leo measure it’s depth and check that against the depth we had available in the rack.

(HowLongIsIt)

As it turned out we needed to move the rack forward a bit in order to leave enough space behind it. The rack is currently installed in front of a structural column and some framing. Once Leo measured the available distance we moved the rack forward about 8 inches. That provided plenty of space for the new server and access to it’s wiring.

(MustMoveTheRackToMakeRoom)

That solved one problem but we still had the issue of the rails being too long for the rack. Normally I might take a hack saw to them and modify them to fit but in this case that would not be possible – and besides: the rail kit from Dell is great and we might use it later if we ever move this server out of the Mad Lab and into one of the data centers.

Luckily I’d solved this problem before and it turned out we had the parts to do it this time as well. Each of these slim-line racks has a number of cross members installed for ventilation and stability. These are pretty tough pieces of kit though so they can be used in a pinch to act as supports for the front and back of a long server like this. Just our luck we had two installed – they just needed to be moved a bit.

(WeWillUseTheseBracesInsteadOfRails)

I explained to Leo how the holes are drilled in a rack, the concept of “units” (1-U, 2-U, etc), and where I wanted the new server to live. Leo measured the height and Ian counted holes to find the new locations for the front and back braces.

(IanAndLeoInstallTheBackSupport)

Then Leo held the cabling back while I loaded the new server into the rack. We keep power cables on the left side and signal cables on the right (from the front). The gap between the sides and the rails makes for nice channels to keep the cabling neat… well, ok, neat enough ;-). If this rack were living in a data center then it wouldn’t be modified very often and all of the cables would be tightly controlled. This rack lives at the Mad Lab where things are frequently moved around and so we allow for a little more chaos.

(HoldPowerOnLeftSignalOnRight)

Once the server is over the first brace it’s easy to manage. In fact, it’s pretty light as servers go. This kind of thing can be done with one person but it’s always best to have a helper.

(SlidesRigthIn)

Once the server was in place we tightened up the thumb screws on the front. If the braces weren’t in the right place this wouldn’t have worked because the screw holes wouldn’t have aligned. Leo and Ian had it nailed and the screws mated up perfectly.

(TightenTheLeftThumbScrew) (TightenTheRightThumbScrew)

With the physical installation out of the way it was time to wire up the beast. It’s a bit dark in the back of the rack so we needed some light. Luckily this year I got one of the best stocking stuffers ever – a HUGlight.

(BestStockingStufferEver)

The LEDs are bright and the bendable arms are sturdy. You can bend the thing to hang it in your work area, snake it through holes to put light where you need it, stand it on the floor pointing up at your work… The possibilities are endless. Leo thought of a way to use it that I hadn’t yet – he made it into a hat!

(LeoWithHugLightOn)

Once the wiring was complete I threw the keyboard and monitor on top, plugged it in, and pushed the button (smoke test). Sure enough, as I feared, the server sounded like a jet engine when it started up. For a moment it was the loudest thing in the house and clearly could not live there next to the studio if it was going to be that loud… either that or I would have to turn it off from time to time, and I sure didn’t want to do that.

Then after a few seconds the fans throttled back and it became surprisingly quiet! In fact it turns out that with the door of the rack closed and the existing acoustic treatments I’ve made to the room this server will be fine right where it is. I will continue to treat the room to isolate it (that project is only just beginning) but for now what we have is sufficient. What a relief.

Within a minute or two I had the system configured and ready for ESXi.

(ItIsAlive)

The keyboard and monitor wouldn’t be needed for long. One of the best decisions I made was to order the server with DRAC installed. Once it was configured with an IP address and connected to the network I could access the console from anywhere on my control network with my web browser (and Java). Not only that but all of the health monitors (and then some) are also available. It was well worth the few extra dollars it cost. I doubt I’ll ever install another server without it.

Back in the day we needed to physically lay hand on servers to restart them; and we had to use special software and hardware gadgets to diagnose power or temperature problems – up hill, both ways, bare feet, in the snow!! But I digress…

(MadRackAfter)

After that I installed ESXi, pulled out the disk and closed the door. I was able to perform the rest of the setup from my desk:

  • Configured the ESXi password, control network parameters, etc.

  • Downloaded vSphere client and installed it.

  • Connected to the ESXi host, installed the license key.

  • Setup the first VM to run Ubuntu 9.10 with multiple CPUs.

  • … and so on

The server has now been alive and doing real work for a few days and continues to run smoothly. In fact I’ve not had to go back into that room since except to look at the blinking lights (a perk).